Tuesday, January 22, 2013

Strawberry Pie

I have always had a fascination for fresh strawberry pie. You know the kind where only the crust is baked? The berries are often piled taller than the Empire State building with a cheery red glaze and it just screams summertime. That's the kind of pie I'm talking about. I can guess what you're thinking. From that description and from the fact that I have had this strange fascination for fresh strawberry pie since childhood you would think I have been eating them all my life. Well, you'd be wrong.

I didn't try this kind of pie until I made one for me and Tim this year. I was on a pie kick, we had gotten some beautiful (organic) strawberries from Be Wise Ranch and I thought that this was the time. As it happens, I also had run across an article in Cooks Illustrated that looked yummy. See as fascinated as I have always been with fresh Strawberry pie I have been equally repulsed by the red glow-in-the-dark gel they sell in the grocery store. I always thought there couldn't be one without the other. And since I refused to eat one, I didn't eat the other. But as it so happens Cooks Illustrated had a recipe for that.

This is my favorite and the easiest fresh strawberry pie recipe you'll ever come across. I have since had other strawberries pies, but none of them hold a candle to this one. Promise. There is a specialty ingredient (Sure-Jell) you most likely don't have in your cupboard unless you're a jammer or a canner. But don't worry. It is easily found at most grocery stores and it will last a long while. Walmart has a decent canning section and you should find it there without any difficulties.

That leaves just the pastry. If you want the appearance of homemade but don't want to make a pie crust, pick up a box of pre-made pie crusts where they have the cookie dough and biscuits in a can. They aren't bad, better than frozen and you can honestly say you baked it yourself! But if you want to go that extra mile, check out my tips on blind baking.


FRESH STRAWBERRY PIE

Published May 1, 2011.   From Cook's Illustrated.
Makes one 9-inch pie, serving 8 to 10.  

WHY THIS RECIPE WORKS:

We knew that the success of our Fresh Strawberry Pie recipe hinged on getting the thickener just right. When none of the thickeners that we tried worked on their own, we decided to use a combination of two: pectin (in the form of a homemade strawberry jam) and cornstarch. In our strawberry pie recipe by themselves, pectin produced a filling that was too firm and cornstarch one that was too loose. But together they produced just the right supple, lightly clingy glaze that was perfect for our strawberry pie.
To account for any imperfect strawberries, the ingredient list calls for several more ounces of berries than will be used in the pie. If possible, seek out ripe, farmers’ market–quality berries. Make certain that you use Sure-Jell engineered for low- or no-sugar recipes (packaged in a pink box) and not regular Sure-Jell (in a yellow box); otherwise, the glaze will not set properly. The pie is at its best after two or three hours of chilling; as it continues to chill, the glaze becomes softer and wetter, though the pie will taste just as good.

INGREDIENTS

  • Filling
  • 4pints (about 3 pounds) fresh strawberries , gently rinsed and dried, hulled (see note)
  • 3/4cup (5 1/4 ounces) sugar
  • 2tablespoons cornstarch
  • 1 1/2teaspoons Sure-Jell for low-sugar recipes (see note)
  • Generous pinch Table salt
  • 1tablespoon juice from 1 lemon
  • 1recipe Baked Pie Shell (see blind baking @Jensgoodfood.blogspot.com)
  • Whipped Cream
  • 1cup cold heavy cream
  • 1tablespoon sugar

INSTRUCTIONS

  1. 1. FOR THE FILLING: Select 6 ounces misshapen, underripe, or otherwise unattractive berries, halving those that are large; you should have about 1½ cups. In food processor, process berries to smooth puree, 20 to 30 seconds, scraping down bowl as needed. You should have about ¾ cup puree.
  2. 2. Whisk sugar, cornstarch, Sure-Jell, and salt in medium saucepan. Stir in berry puree, making sure to scrape corners of pan. Cook over medium-high heat, stirring constantly with heatproof rubber spatula, and bring to full boil. Boil, scraping bottom and sides of pan to prevent scorching, for 2 minutes to ensure that cornstarch is fully cooked (mixture will appear frothy when it first reaches boil, then will darken and thicken with further cooking). Transfer to large bowl and stir in lemon juice. Let cool to room temperature.
  3. 3. Meanwhile, pick over remaining berries and measure out 2 pounds of most attractive ones; halve only extra-large berries. Add berries to bowl with glaze and fold gently with rubber spatula until berries are evenly coated. Scoop berries into pie shell, piling into mound. If any cut sides face up on top, turn them face down. If necessary, rearrange berries so that holes are filled and mound looks attractive. Refrigerate pie until chilled, about 2 hours. Serve within 5 hours of chilling.?
  4. 4. FOR THE WHIPPED CREAM: Just before serving, beat cream and sugar with electric mixer on low speed until small bubbles form, about 30 seconds. Increase speed to medium; continue beating until beaters leave trail, about 30 additional seconds. Increase speed to high; continue beating until cream is smooth, thick, and nearly doubled in volume and forms soft peaks, 30 to 60 seconds.
  5. 5. Cut pie into wedges. Serve with whipped cream.

TECHNIQUE

Through Thick and Thin
Most fresh strawberry pies fail because they're overloaded with thickeners that either gum up the filling or never manage to thicken it at all.


TOO STIFF
Thicken strawberry pie filling with gelatin and the result resembles Jello.
TOO THIN
Thicken strawberry pie filling with cornstarch and the result typically turns out gloppy, dull-tasting, and  still not firm enough.


Technique

Doubling Up to Thicken Juicy Fruit
To create a filling with just enough sticking power to hold the berries together gently, we turned to a thickener more common in jam than pie - low-sugar pectin - and used it in combination with cornstarch. Both products work similarly: When combined with liquid, then heated and cooled, some of their molecules bond together, trapping water and creating a solid, jelly-like structure. But the strength and properties of the two structures differ. Amylose, one of two types of starch molecules in cornstarch, forms a weak structure that easily comes apart under the weight of heavy, juicy-filled strawberries. Low-sugar pectin (which, unlike regular pectin, gels without added sugar and acid) contains bigger molecules that form a firmer structure held together more forcefully by calcium ions. Once created, this matrix resists coming apart.


Wednesday, May 2, 2012

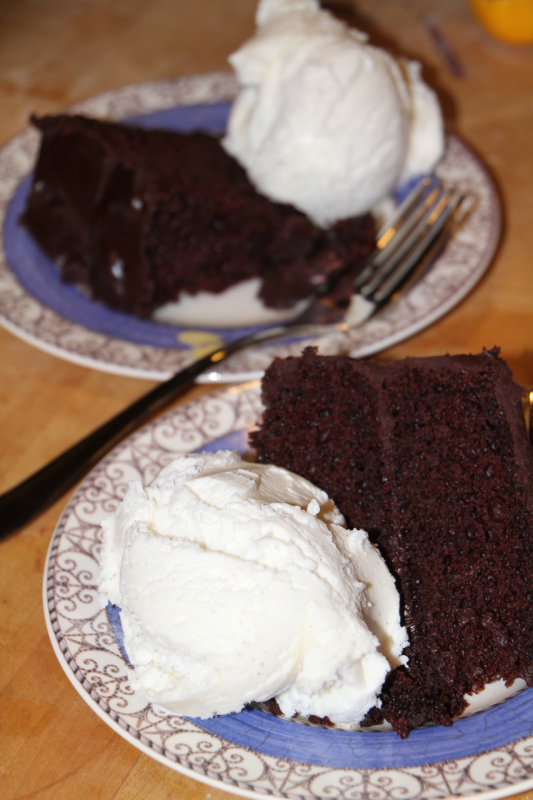
German Choclate Cake (My Current Go-To Cake)

Easy to make, even easier to eat.

Ever since I was a kid, my favorite kind of cake has always been German Chocolate Cake. I don't know. There's something special about this cake, something magical. First off the frosting isn't really frosting, not in the typical sense. And as someone who loves nuts, the candy-like concoction that covers this cake is basically a sugary mess of pecans and coconut. What's not to love? And then there is the cake it's self. Chocolate. But not just any kind of chocolate. German chocolate. As a child it sounded exotic. As an adult I would purchase the green wrapped bar of German Sweet Chocolate by Baker's. But now I go for something else. And here's why.

German Chocolate Cake isn’t really German at all. Nope. In fact it’s named for it's creator Samuel German, the man who created the original cake recipe’s star ingredient back in 1957 for Baker’s Chocolate Company. German’s chocolate contains only 46% cacao, which makes for a subtly flavored cake. This recipe for German Chocolate Cake from  Fine Cooking Magazine uses a moderate amount of semisweet or bittersweet chocolate—up to 70%—for deeper flavor. You can use any semisweet or bittersweet chocolate you like, as long as it contains 70% cacao or less. Any more than that could adversely affect the cake’s texture.

Serves 16


For the cakes
4 oz. (1/2 cup) unsalted butter, softened; more for the pans
4 oz. semisweet or bittersweet chocolate (up to 70% cacao), coarsely chopped (about 1 cup)*
1/2 cup boiling water
9 oz. (2 cups) unbleached all-purpose flour
1 tsp. baking soda
1/2 tsp. table salt
4 large eggs, at room temperature
2 cups granulated sugar
1 tsp. pure vanilla extract
1 cup buttermilk, at room temperature**

For the coconut-pecan filling
7 oz. (about 2 cups) sweetened, shredded dried coconut
4 large egg yolks
1 12-oz. can evaporated milk
1-1/2 cups granulated sugar
2 tsp. pure vanilla extract
3/4 tsp. table salt
6 oz. (3/4 cup) unsalted butter, cut into chunks
1-1/2 cups pecan halves, toasted and coarsely chopped


Make the cakes
Position racks in the upper and lower thirds of the oven and heat the oven to 350°F. Grease the sides of three 9x2-inch round cake pans with butter and line the bottoms with parchment circles.
Put the chocolate in a small bowl and pour the boiling water over it. Let stand for several seconds and then whisk until the chocolate is dissolved. Set aside until cool to the touch before mixing the batter.
Sift the flour, baking soda, and salt onto a sheet of waxed paper. Whisk the eggs in a small measuring cup.

Beat the butter for a few seconds in a stand mixer fitted with the paddle attachment on medium-low speed. Add the sugar in a steady stream and then beat on medium speed, scraping the bowl as necessary, until the mixture is lightened in color and fluffy, 4 to 5 minutes. Still on medium speed, add the eggs a little at a time, taking a full 1-1/2 minutes to add them all. Add the melted chocolate and vanilla and beat just until blended. With the mixer turned off, add a quarter of the flour mixture.

Mix on medium-low speed just until incorporated. Add a third of the buttermilk and mix until blended. Repeat, each time adding another quarter of the flour, then a third of the buttermilk, until the last of the flour is added. Scrape the bowl as necessary and mix each addition only until it is incorporated.

Divide the batter among the pans and spread it evenly. Bake, rotating the pans and swapping their positions, until the cakes just start to pull away from the sides of the pans and spring back when very gently pressed with a finger, 20 to 25 minutes. Let the cakes cool in their pans on a rack for 10 minutes.

Run a knife or small spatula around the edges to separate the cakes from the pans. Turn the cakes out onto the rack and peel off the parchment. Cool completely.

Make the filling
Spread the coconut on a rimmed baking sheet. Bake at 350°F, stirring every 2 minutes, until golden-brown, about 10 minutes. Scrape the toasted coconut onto a sheet of waxed paper and let cool completely.

Whisk the egg yolks with the evaporated milk, sugar, vanilla, and salt in a heavy-duty, nonreactive 4-quart saucepan. Add the butter. Set over medium heat and stir constantly with a heatproof spatula, scraping the bottom and corners of the pot. When the mixture starts to boil, adjust the heat so that it boils actively but not furiously, and cook, stirring constantly, until golden and thickened, 3 to 4 minutes. Off the heat, stir in the coconut and pecans. Let cool completely.

Assemble the Cake
Put one cake layer on a cake plate. Spread a third of the filling over the top of the cake, leaving a 1/4-inch border. Top with a second cake layer. Spread with half of the remaining filling. Put the third cake layer on top and cover it with the remaining filling. Leave the sides of the cake exposed. Serve at room temperature.

From Fine Cooking  #114 , pp. 82-87
October 10, 2011

*I like to use Ghirardelli's Bittersweet chocolate, found in the baking aisle.

**If you don't have buttermilk, you can make your own, like I do. In a 1 cup measuring cup add 1 tablespoon of white vinegar. To this add whole milk to the 1 cup mark.Stir and let sit for several minutes before using.  You may also substitute lemon juice for the white vinegar.

Saffron...It's What's For Dinner!

Just how many containers do I have to get dirty to make a "one pot meal"???

Tonight for dinner Tim and I are going to make a semi-old favorite. It is Chicken and Rice with Saffron and Almonds. I'd say it was a one-pot meal but that would be a misnomer. We've just started and already I've use 4 containers! Well, I could have shortened that to 2, but come on.

2 cups of rice
1/2 teaspoon of saffron
Warm Water

2-3 Chicken Breasts broken down in to 1/2" cubes
Salt
Pepper

Olive Oil (or your go-to cooking oil)
1/2 cup slivered almonds

4 tablespoons of butter

4 cups chicken broth

Step 1:
Put the rice into something that will accommodate it being covered with warm water such as a pot or a 4-cup measuring cup. In a small container put the saffron and add 1/3 cup warm water. Let both of these soak for 20 minutes. (I use Mexican Saffron, which is a lot cheaper. If you use "real" saffron decrease the amount by 1/2)

Step 2:
If you haven't yet, break down the chicken and season with salt and pepper.

Step 3:
Into a large skillet (which you'll cook everything else in later) add 1/3 cup oil of choice and almonds. Fry them up until brown over medium-high heat (3-5 minutes). Drain almonds on paper towel and set aside.

Step 4:
Wipe out the pan (if needed), add more oil and heat it slightly before adding the chicken. Get some yummy brown on the chicken. [You don't need to cook the chicken all the way through because it will cook more in a bit.] Set chicken aside.

Step 5:
Give the pan a quick wipe out with a paper towel.
Drain the rice.

Step 6:
Add the butter and saute the rice the big pan. Add the saffron and water mixture to the rice. Add the chicken broth and season rice with salt and pepper. Add the chicken.

Step 7:
Cover, turn the heat to low and simmer for 20 minutes or until all the liquid should be absorbed and holes should appear on surface. Remove from heat.

Step 8:
Place a layer of paper towels on top of the rice and cover with lid. Let sit 10 more minutes.

Step 9:
Add the almonds in and serve!

Sunday, April 29, 2012

Everyone's Favorite--Pizza!

Pizza is one of our favorite things to eat. It also happens to be one of the easiest and most delicious things to makes, in my opinion. The great thing about pizza is you can make it as simple or as complicated as you want. I am going to tell you how we make our favorite pizza!

It all starts with the crust.

I have a couple of different recipes for crust, but I find myself going back to the same one over and over again. It just is so easy and fast:

Jen's Easy-P-Z Pizza Dough
1 cup warm water (110-115 F)
1 package or 2 teaspoons active dry yeast (Rapid Rise is fine)
2 tablespoons olive oil
1 teaspoon salt
4-6 cups all purpose bleached or unbleached flour
olive oil

1. To make good anything that involves yeast, it is important that the water be at the correct temperature. Too cold and the yeast is sluggish. To hot and the yeast is dead. Invest in an instant read thermometer. I use one that I bought at a restaurant supply store for less than $5.

2. Pour the warm water into a medium to large bowl. The bowl should be able to comfortably hold a volleyball.  Sprinkle or dump the yeast into the water and give it a quick stir. Set this aside for a few minutes to let it work.

3. Add the olive oil and the salt and stir.

4. Stir in 2 cups of flour.

5. Add remaining flour in 1/2 cup increments until the dough goes from batter-like to dough-like. You'll be able to tell because it will start to pull away from the sides of the bowl. It will be somewhat sticky.

6. Dump dough on a floured surface and work in more flour by kneading until you have a soft, non-sticky dough. You'll feel the change in the dough as you work with it.

7. Pour some olive oil into the bottom of the bowl (1-2 tablespoons). Put the ball of dough back into the bowl on top of the oil and using the dough, smear the inside of the bowl. Basically you're just turning the dough upside down so that it and the bowl and coated in a light sheen of oil.

8. Cover the bowl with plastic wrap or a towel and leave it in a warm, draft free place for 1 hour. (If you used Rapid Rise you need only wait 30 minutes) I like to put the bowl of dough in my oven. If it is cold, I will turn my oven on to 500 for 2-3 minutes then turn it off before I put the bowl of dough in.

Making the Pizza.

About half way through the rising process I start gathering the other ingredients for the pizza and getting things together. For our favorite Friday Night Pizza you'll need the following:

Pesto Sauce
Mozzarella Cheese
Pepperoni
Baby Portabella Mushrooms
Cornmeal
Pizza Stone
Pizza Peel or a cookie sheet

You can make your own pesto sauce which is really easy. All you need is some fresh basil, olive oil, Parmesan cheese, salt, pepper and garlic. All of that gets blended together to make a spreadable paste. You can also purchase prepared pesto sauce like I do. My favorite brands are Trader Joe's (the fresh one!) and Costco's pesto sauce. I get the cold stuff in the deli section. The canned stuff is much too salty. If you've been getting take-out pizza you might not notice the difference, but trust me. Once you've been consistently eating homemade pizza you'll be able to tell just how salty that canned stuff is.

How many pizzas does this dough make? Well, that depends on you.

Thick or thin?

Big or small?

I usually get between 4 and 6 pizzas depending on how thin I roll the dough. I like to be able to tell where my fingers are on the other side of the dough but not to actually see them.

Sprinkle some cornmeal onto your pizza peel or paddle (or cookie sheet without sides) and spread your pre-rolled dough on top. I aim for a 9-10 inch pizza, about the size of a dinner plate.

Smear some pesto sauce on the pizza.


Now add some cheese. You want to be able to see the sauce through the cheese. Trust me. This will be plenty cheesy.
 Now comes the pepperoni....
 ....and the mushrooms. I like to do it this way because sometimes the topping shake loose when you're putting the pizza onto the stone. If I loose a little cheese or a mushroom piece or two I don't care. I do get annoyed when the meat falls off.
Now we bake your pizza in your 400 degree oven for 10-15 minutes. Again. This depends on the size of your pizza and how much color you want on it.

What normally happens in our house is I have the uncooked pizza on the pizza peel and the cooked pizza comes out on a cookie sheet. This way I can keep things moving pretty quick!
For fun on the pizza below I sliced the pepperoni the long way. I also gave the pizza a lot of color. I like the caramelized almost nutty taste you get when you cook things a little while longer.
And there you have it. The beginning of a promising weekend! So open a beer, pull out the yeast and get cooking! And please, let me know how it goes.

Saturday, January 28, 2012

Community Supported Agriculture & Certified Organic

So we have heard about these community farms for some time. And about co-ops and such. A good friend of ours, Suzann Leininger, was a member of a Community Supported Agriculture Program in northern San Diego called Be Wise Ranch.

We were always concerned we'd get food we didn't like, or that we wouldn't be able to eat it all, etc. You know, excuses.

Well, I started looking at it again, this time in more detail. There are a number of options available - I think that's a great idea - which help make it more flexible to fit what a family wants/needs. You can choose between the Large and Small boxes (actually I was quite surprised to see how close in size the boxes are). And they have added another option - every-other-week pickup.

We checked in with Suzann. She and her husband Bill get the Small box every-other-week. We decided to go for it, and selected the Large box, every-other-week. Oh ya, and if you find you want the other size, or to pickup every week, you can switch.

So Thursday we picked up our first box!

Too bad you can't see the carrots in the photo. It's really quite a haul. Hard to see it all in the photo. Here's a list of what was in the box this week...

Arugula
Apples
Bok Choy
Carrots
Celery
Kale
Lettuce
Mizuna - this one is totally new to us!
Mustard Greens
Oranges
Radishes
Basil
Spring Mix

The hope is that this will help us to be better about eating our fruits and veggies, and eat more greens. So far so good. Now we need to work on getting creative with all this bounty and work it into our cooking.

Be Wise helps here too, with a page of recipes from other members. We will have to be good citizens and add some recipes there too!

Friday, December 2, 2011

Chocolate Coffee Cake, AKA Chocolate Babka

This is my all time favorite chocolate coffee cake. It isn't hard to make, it just takes a lot of time. The upside is that it makes 3 loaves so you have 1 for you and 2 to give to as gifts. Or, if you really loves these, freeze the other two and pull them out as needed. Please note that coffee cake is never as good as it is when it is freshly made. This is a big serving and in my opinion it is best when you serve it people you really, really like. Or really want to impress!

So here it is, Martha Stewart's....

Chocolate Babka

When shaping the babka, twist dough evenly throughout the length of the roll a full 5 to 6 turns. The babka can be prepared up to step 8 and frozen for up to a month before baking. When ready to bake, remove from freezer; let stand at room temperature for about 5 hours, and bake.
Martha Stewart Living, May 2000
  • Yield Makes 3 loaves

Ingredients

  • 1 1/2 cups warm milk, 110 degrees
  • 2 (1/4 ounce each) packages active dry yeast
  • 1 3/4 cups plus a pinch of sugar
  • 3 whole large eggs, room temperature
  • 2 large egg yolks, room temperature
  • 6 cups all-purpose flour, plus more for work surface
  • 1 teaspoon salt
  • 1 3/4 cups (3 1/2 sticks) unsalted butter, cut into 1-inch pieces, room temperature, plus more for bowl and loaf pans
  • 2 1/4 pounds semisweet chocolate, very finely chopped
  • 2 1/2 tablespoons ground cinnamon
  • 1 tablespoon heavy cream
  • Streusel Topping (at bottom of page)

Directions

  1. Pour warm milk into a small bowl. Sprinkle yeast and pinch of sugar over milk; let stand until foamy, about 5 minutes.
  2. In a bowl, whisk together 3/4 cup sugar, 2 eggs, and egg yolks. Add egg mixture to yeast mixture, and whisk to combine.
  3. In the bowl of an electric mixer fitted with the paddle attachment, combine flour and salt. Add egg mixture, and beat on low speed until almost all the flour is incorporated, about 30 seconds. Change to the dough hook. Add 2 sticks butter, and beat until flour mixture and butter are completely incorporated, and a smooth, soft dough that's slightly sticky when squeezed is formed, about 10 minutes.
  4. Turn dough out onto a lightly floured surface, and knead a few turns until smooth. Butter a large bowl. Place dough in bowl, and turn to coat. Cover tightly with plastic wrap. Set aside in a warm place to rise until doubled in bulk, about 1 hour.
  5. Place chocolate, remaining cup sugar, and cinnamon in a large bowl, and stir to combine. Using two knives or a pastry cutter, cut in remaining 1 1/2 sticks butter until well combined; set filling aside.
  6. Generously butter three 9-by-5-by-2 3/4-inch loaf pans; line them with parchment paper. Beat remaining egg with 1 tablespoon cream; set egg wash aside. Punch back the dough, and transfer to a clean surface. Let rest 5 minutes. Cut into 3 equal pieces. Keep 2 pieces covered with plastic wrap while working with the remaining piece. On a generously floured surface, roll dough out into a 16-inch square; it should be 1/8 inch thick.
  7. Brush edges with reserved egg wash. Crumble 1/3 of the reserved chocolate filling evenly over dough, leaving a 1/4-inch border. Refresh egg wash if needed. Roll dough up tightly like a jelly roll. Pinch ends together to seal. Twist 5 or 6 turns. Brush top of roll with egg wash. Carefully crumble 2 tablespoons filling over the left half of the roll, being careful not to let mixture slide off. Fold right half of the roll over onto the coated left half. Fold ends under, and pinch to seal. Twist roll 2 turns, and fit into prepared pan. Repeat with the remaining 2 pieces of dough and remaining filling.
  8. Heat oven to 350 degrees. Brush the top of each loaf with egg wash. Crumble 1/3 of streusel topping over each loaf. Loosely cover each pan with plastic wrap, and let stand in a warm place 20 to 30 minutes.
  9. Bake loaves, rotating halfway through, until golden, about 55 minutes. Lower oven temperature to 325 degrees. Bake until babkas are deep golden, 15 to 20 minutes more. Remove from oven, and transfer to wire racks until cool. Remove from pans; serve.
  • Yield Makes 3 3/4 cups

Streusel Topping

Ingredients

  • 1 2/3 cups confectioners' sugar
  • 1 1/3 cups all-purpose flour
  • 12 tablespoons (1 1/2 sticks) unsalted butter, room temperature

Directions

  1. In a large bowl, combine sugar, flour, and butter. Using a fork, stir until fully combined with clumps ranging in size from crumbs to 1 inch.

Thursday, November 3, 2011

A Dinner for Lions


Tonight Tim has Lions and he has asked me to make dinner for them. So he promised everyone meatloaf, so I'll be making that later today. I love to combine beef and pork together (50/50) with whatever else sounds good at the moment. I usually add egg, breadcrumbs, parsley and onions (and of course salt and pepper!) what comes after that is the mystery! I have picked up a good little trick along the way: Pinch off a small piece of the meatloaf mixture and fry it up in a pan with some oil. This is your best way of finding out what your meatloaf needs while you are still in a position to fix it!

Of course you can't just have meatloaf for dinner. You have to have potatoes. But I am not much of a fan of gravy. Don't get me wrong, I love a good gravy, but I just don't feel like making any. So I picked up box of sweet potatoes instead. I was going to bake, skin and mash them but I think my life will be infinity easier if I just bake them and let everyone do what they want to them.

I will do something for a salad, not sure yet what that will be. I am also going to send some rolls along for dinner. I loooooove me some dinner rolls with a thick slice of butter melting in the middle of a roll. Mmmmmmm. So here are te rolls I am going to make for this evening. I wanted something simple that wouldn't take a lot of my time shaping and rising and rolling and all that stuff. So I chose these: Classic Dinner Rolls - Fine Cooking Recipes, Techniques and Tips.

Lastly, my favorite part of almost any meal is dessert! I wanted to bake a cake, but unless I use a mix I have run out of time. So I think I'll make some bar cookies that I have been eyeing in "Baked: New Frontiers in Bakin" by Matt Lewis and Renato Poliafito, their Peanut Butter Crispy Bars (page 133, if you have the book). I think I will also send the leftover chocolate truffles from Linda and Steve's 40's Wedding Anniversary Party. Now that was fun!


Saturday, September 3, 2011

Super Easy Crockpot Pork Tenderloin

My step-mother-in-law (love you, Joyce!) used to make a great slow-cooker pork for Sunday dinner when the family would go to visit her and dad in Ramona. (Unfortunately for us, she moved to Texas and took her yummy down home cooking with her.) Joyce said she just threw it in with some water and a package of onion soup mix and cooked it, but it sure didn't taste that way. I always thought it was something special. The meat was juicy without being yet, and came apart in chucks just the right size. So, finally, I decided I would believe her, that it was really that easy, and make her famous slow-cooker pork for dinner.

Well. I did it. And I have to say (and my husband agrees), that mine was just as good as hers, and maybe even better!

Here is what I did, and what you can do to update this old family classic and stand-by. Feel free to tweak this to make it your something special. Think of this dish as your After Church/Work/Soccer Practice/Ballet Class/Carpool/Or Whatever Pork Tenderloin

1. In the crockpot your going to cook your pork in, add 1 cup of chicken broth. Homemade is best, but low-sodium from the store will do just fine.

2. To the chicken broth add 1 package of brown onion soup mix, the type typically use to make onion dip. Next add 1 tablespoon balsamic vinegar, 3 tablespoons Worcestershire sauce and 4 tablespoons of soy sauce. Mix this up and let sit while you work on Step 3.

3. In a heavy skillet over medium-high heat, 1-2 tablespoons of your favorite cooking oil, I like olive oil. Pat the pork dry with a paper towel and add the pork to the hot grease. Let the pork sir undisturbed for several minutes to brown the outsides to give the meat some color. Your're not trying to cook it. Just give it some color so you don't pull out a monotone piece of meat later on.

4. Once the meat is lightly browned remove it from the pan and lower it into the chicken broth and onion soup mix. Add more chicken broth until the meat is covered. You may also add some water in place of broth, if you so desire.

5. Cook on high for 3 hours or on low for 6 hours. Test meat for doneness. The best way to see if the pork is cooked through is to use an instant read thermometer. Test the meat in the very center. The thermometer should read 145 degrees. (You can find inexpensive instant read thermometers at restaurant supply stores. They also sell them in the baking aisle of most grocery stores and in the cooking section of most department stores as well as many discount stores such as Target and Walmart.) If you don't have a thermometer, use 2 forks to see if the meat is done. The meat should flake apart and there should be no pink inside.

The pork is great with mash potatoes or even a side of rice. Add a bag of salad and you have an easy dinner for the family that only requires the minimum of prep.

Monday, August 29, 2011

Quick Chicken Parmesan

If you love ordering chicken parmesan when you go out to eat at an Italian restaurant, then you are going to love this...and you'll start to look for other things on the menu to try at that restaurant. Honest. This is just that good and that easy to make.


Quick Chicken Parmesan

Serves 4

Click here to find out more!
Nonstick cooking spray
2-1/4 oz. (1/2 cup) unbleached all-purpose flour
Freshly ground black pepper
2 large eggs
1-1/2 cups panko breadcrumbs
4 thin-sliced boneless, skinless chicken breast cutlets (about 14 oz.)
Kosher salt
5 Tbs. olive oil
1/4 cup freshly grated Parmigiano-Reggiano (use the small holes on a box grater)
4 oz. fresh mozzarella, thinly sliced
1 small yellow onion, chopped
2 medium cloves garlic, finely chopped
One 14.5-oz. can crushed tomatoes (preferably Muir Glen fire-roasted crushed tomatoes)
1/4 cup packed fresh basil, chopped (1/2 oz.)

Position a rack in the center of the oven and heat the oven to 425°F. Line a large rimmed baking sheet with foil and lightly coat the foil with nonstick cooking spray.

Mix the flour and 1/4 tsp. pepper in a wide, shallow dish. In a second wide, shallow dish, lightly beat the eggs with 1 Tbs. water. Put the panko in a third wide, shallow dish. Season the chicken with salt and coat each piece in the flour, tapping off the excess, then the egg, and then the panko, pressing the panko to help it adhere.

Heat 2 Tbs. of the oil in a 12-inch nonstick skillet over medium-high heat. Working in two batches, cook the chicken, flipping once, until the crumbs are golden and the chicken is almost cooked through, 1 to 2 minutes per side, adding 2 Tbs. more oil for the second batch. Transfer the chicken to the prepared baking sheet. Sprinkle the chicken with the Parmigiano and then top evenly with the mozzarella. Bake until the cheese is melted and the chicken is cooked through, 5 to 7 minutes.

Meanwhile, wipe the skillet clean and set over medium heat. Pour in the remaining 1 Tbs. oil and then add the onion and garlic. Cook, stirring often, until the onion is tender and lightly browned, 3 to 4 minutes. Stir in the tomatoes and 1/4 tsp. salt. Simmer, stirring occasionally, until thickened, 4 to 5 minutes. Remove from the heat and stir in the basil. Season to taste with salt and pepper. Serve the sauce over the chicken.
(To see this on FineCooking.com go here: Chicken Parmesan - Fine Cooking Recipes, Techniques and Tips. Recipe by Melissa Gaman)


This is a truly excellent dish and super easy to make. To make this Tim & Jen style substitute crushed saltine crackers for panko and add some of those Topper's lightly salted crispy onions (used for salad) or the ones you use on green bean casserole. We also used a bottle of our favorite marinara sauce instead of making the quick tomato sauce.

This is a great dish to make extra of and freeze. We had a lot of chicken and went ahead and fried up a bunch of breast strips and then froze them on a baking sheet with the cheese on top. From there it was easy to wrap up and freeze for later. Later turned out to be less than a week. This was just too good to keep in the freezer! To reheat just turn the oven on and cook as directed. It may take a minute or two longer, but not much. We found this defrosted and cooked very quickly.

Enjoy!

Sunday, August 28, 2011

Steak and Blueberries

Last night we had Suzann, Bill, Linda and Steve over for dinner. It was a great group, and I planned it so I actually got a chance to sit down and enjoy my guests.

First, I set the table ahead of time and decided, since we were such a small group, to serve the meal family style. Also, I  went super easy on the appetizers, which just left the salad and corn, and lighting the candles (Tim handled the main dish) as last minute items.

Our original menu included chips and salsa and a bowl of olives to much on, but at the last minute we decided to leave them off as we had more than enough food. Instead we just opened a container of pub cheese from Trader Joes (TJ’s), some herbed goat cheese, a box of wheat thins and I sliced up the stag salami we got in London at the Borough Street Market while we were on holiday this summer. I finished that off with a plate of green and black grapes with a sprinkling of strawberries for additional color. Alternating the grapes on the plate made the fruit look nice and gave it an additional panache.

For the main event Tim cooked sirloin steaks with a new rub we found in Food Magazine and we served it with individual ramekins of the accompany steak sauce, both of which went over well. I axed the twice baked potatoes, mainly because I remembered them too late and also because we didn’t need them. There was plenty to eat with the fresh green salad (which I topped with sliced beets from TJ’s, carrots, homegrown tomatoes from a friend, red bell pepper and mushrooms) and corn on the cob. I cooked the corn in the microwave, tossing the ears whole the way they come off the plant silk and all. Two ears take about three minutes. Lastly I made fantail rolls from scratch, which we served with butter.

For dessert everyone joined me in the kitchen as I whipped up fresh whipped cream which was spread on top of the Chocolate Pavolva followed by a generous sprinkling of raspberries. I also served a blueberry and lemon marmalade infused with a hint of lavender loose form tart. The tart was my own spin off something I saw on TV and it was delicious! We offered vanilla ice cream for those that wanted it. It was a wonderful meal and a spectacular dinner because we shared great food with great friends. That’s the winning combination!

Recipes

Steak Rub

1/4 cup ancho chile powder
1 1/2 tablespoons sweet paprika
2 teaspoons dried oregano
2 teaspoons ground coriander
2 teaspoons dry mustard
2 teaspoons kosher salt
2 teaspoons freshly ground pepper
1 teaspoon ground cumin

Whisk everything in a bowl. Pull steak out of refrigerator about 20 minutes before you want to grill it. Sprinkle rub on one side of steak and let sit. Grill rub side down. (Food Network Magazine June 2010, page 149)

Steak Sauce

1/4 cup dijon mustard
1/4 cup whole grain mustard
1/4 cup molasses
2 tablespoons ketchup
2 tablespoons honey
1 tablespoons prepared horseradish
1/2 teaspoons kosher salt
1/4 teaspoon freshly ground pepper

Whisk all the ingredients together in a bowl, cover and refrigerate at least 30 minutes and up to 1 day. Bring to room temperature before serving. (Food Network Magazine June 2010, page 149)

Chocolate Raspberry Pavlova
(Food Network Magazine June 2010, page 140)

Blueberry Tart with Lemon Marmalade infused with Lavender

Puff Pasty
Blueberries
Marmalade
Tapioca
Tuberino Sugar
Water

Preheat oven to 400. Defrost 1 sheet of puff pastry. Once the pastry is defrosted roll it out on a very lightly dusted cutting board. Transfer pastry to a parchment lined baking sheet. Spread a good amount of marmalade in the center and as far out as the blueberries will go. Mound blueberries in center. Sprinkle with a dash of tapioca and some sugar. Fold up the edges of the pastry and brush with water, sprinkling with sugar afterwards. Bake for 30 minutes or until pastry is cooked. Cool.

Sunday, April 10, 2011

Tim's Back from Texas

Yup. Tim is back and it is great, make that beyond fantastic, to have him home again. He had a wonderful visit with his step-mother, Joyce, and his dad. He came back with lots of pictures of Denton (geocruise.blogspot.com) which I was just told are not up yet, but there are tons of great photos just the same.

Anywho, he had a good trip, a hot gay-motorcyclin' cowboy named Justin tried to pick him up at Fuzzy's Taco Shop (I think the name of the place says it all!). He ate BBQ at The Prairie House, Tex-Mex at Fuzzy's (stop thinking that!) & good old home-style-Ramona cooking at Joyce's. Unfortunately he did not get to any of the places on our list! So keep any eye out here as we plan to order some mailorder goodies from the bakery & popcorn place for sure. Who knows, maybe you'll be over at our house for dinner when that happens!

Move Over Original Pancake House!


Last night I promised Tim I'd make him something special for breakfast in the morning. You see, last night I opened up "The Best of Fine Cooking: Sweet Cakes", it is one of those super expensive, extra huge magazines they put out every so often. I wasn't looking for breakfast foods. I was looking for some cake recipe to inspire me into a fit of baking. I found one, an applesauce-walnut cake that I've been eyeing for a while, but it was too late to start anything. But as I was flipping I ran across Skillet Puff Pancake, which looks a lot like the Dutch Boy Pancake they serve at The Original Pancake House. So there I was, looking at the Skillet Puff Pancake, ignoring the Parsnip & Pecan Sour Cream Muffins on the same page, but finding my eyes drawn across the next page and the Fastest-Ever Cinnamon Buns across the way. Hmmm. What to do?

This morning Tim decide that the Skillet Puff Pancake sounded better than the Fastest-Ever Cinnamon Buns, and since we didn't want to shower, hop in the car and drive to the Original Pancake House it was a go.

Skillet Puff Pancake (serves 2)
2 eggs
1/2 cup flour
1/2 cup milk
dash of salt
2 oz (4 tablespoons) butter

Heat oven to 450F and put a large skillet or shallow Dutch-oven in to heat, cast iron is perfect. In a bowl, beat eggs, flour, milk and salt. It's important to mix all ingredients together at once; otherwise, your pancake won't puff. The more air you beat into the batter, the higher it will rise in the oven.* When the oven is hot, toss the butter into the skillet and let it melt. Pour the batter into the skillet and return it to the oven. Bake 12 to 15 minutes, or until the pancake is puffed and golden. Cut in half and serve immediately with warm maple syrup, coffee and the newspaper. (Fine Cooking Magazine)


This has become a favorite weekend breakfast for us. Tim and I love it! It is easy, fast and if you start your bacon in the oven and then make the pancake they'll both come out about the same time.

*I have made this using a KitchenAid and just a run of the mill wire whisk. I promise you, the whisk makes a better pancake. You can beat in a lot more air with a whisk then with the whisk attachment and it takes so little time you'll spend half of it just pulling out the mixer if you're like me and store it under the counter. Use the whisk! Use The Whisk! USE the Whisk!!!

Thursday, March 31, 2011

Tim's Off to Texas

Tim is off to Texas soon and I just happen to have a list of places I would like him to try while he's there. And of course I also want him to pick up a little something for me!


Machacek Bakery (300 Grant Ave, Strawn, TX 76475). You might be wondering how on earth you pronounce that, right? Well think I'm a hot chick and just remove the "I" part. So it is M-a-hot-chick Bakery, which is famous for their Kolaches. Kolaches are little pillows of dough with a filling set in the middle, where a hole would be if they awere donuts. I have to say that the pecan ones are the one I am drooling over (Tim, make a note: bring me a dozen Pecan Kolaches, please!).


I am also interested in Cornucopia (1914 Guadalupe St. Suite B Austin Texas 78705), which is in Austin Texas. Recently I tried some popcorn at Costco (different company) and wow, what a revelation. I am hoping that Tim will be able to go here and pick up some yummy popcorn to bring home. One of their signature flavors is Dill Pickel, which I think I might just skip. I will have to try the Cheddar, because that is my favorite popcorn flavor of all time. And the Peanut Brittle sounds delicious, as well. I have made Peanut Butter & Chocolate popcorn and it was devine, so we might as well put that on the list too. In fact, I think I might just order a sample box of flavors and let Tim skip this one. Popcorn does take up a huge amount of room, and I'm afraid he'll eat it all before he gets home!


The last place in Texas is the one Tim will want to try the most, famous Black's BBQ (215 North Main Street, Lockhart, Texas 78644) in Lockhart, Texas. Black's is Texas' oldest, continuously run BBQ restaurant owned by the same family, and according to their site, they are also the best! It sounds as it they are famous for their homemade smoked, double sausage, among other things. But if I know my husband it will be the brisket, but I would want the sausage. Their sausage is not made with the scraps of things no one wants to eat, instead it is made with premium meats, just like the rest of their food. Let's go to Black's!


That is all I have for now, and I'll tell you why. I just started writing down all, the places I want to try, as seen on TV. I have been talking about compiling a list for years so that when we travel we know where we want to eat and things we want to try. So here is what I hope will be the first of many such posts. Keep coming back - we'll keep adding things to make it worth your while.

Sunday, March 6, 2011

Chocolate Cake with Ganache Icing

Chocolate Cake
This make a 9-inch layer cake

Preheat over to 350 and grease two 9-inch round cake pans. Line pans with parchment and grease parchment.

Sift the following together into a large bowl:
3/4 cup cocoa
2 cups sugar
1 3/4 cup all purpose flour
1 1/2 teaspoons baking powder
1 1/2 teaspoons baking soda
1 teaspoon kosher salt

Add to the dry ingredients:
1 cup buttermilk*
2 extra large eggs
1/2 cup vegetable oil
2 teaspoons vanilla extract
1 cup boiling water
(At this point if you wish to make a mocha cake add 1 tablespoon espresso powder to boiling water, mix well)

Whisk everything together until well incorporated. Divide batter between pans and bake for 30-35 minutes or until a knife, toothpick or such comes out clean. Cool for 10 minutes in pan before removing. Cool completely before frosting with Ganache Icing

*if you don't have buttermilk (or don't want to go to the expensive of buying it just for this recipe) add 1 tablespoon of white vinegar OR lemon juice to 1 cup milk (minus 1 tablespoon) and let sit for 5 minutes before using.

Ganche Icing
This makes plenty for the cake, plus enough for a few cupcakes as well.

1 cup heavy cream
10 ounces semi sweet, dark or bitter-sweet chocolate, finely chopped**


Put cream in heavy pan (big enough for both the cream and the chocolate and some wiggle room) over medium heat until bubbles appear around edges. Take pan off heat, add chocolate; shake the pan to submerge the chocolate and leave it to melt for a few minutes. Using a whisk stir gently to mix the chocolate to a smooth cream. Do not beat the mixture or you'll get unwanted bubbles and you'll loose the pretty glossy sheen.

Let sit for 20 to 30 minutes on counter to thicken. You'll want to stir it a few times as the edges will thicken faster than the middle.

Using a wide spatula or icing knife, test the ganache by putting some in the center of the bottom layer of cake. It should fall in thick waves but not run off completely. Allow to set up before serving.

This cake is best at room temperature, but you can refrigerate it. The original recipe suggests sandwiching the cakes together with your favorite jam. I am a bit of a purist and just want chocolate, so  have omitted this step completely.


**For best results do not use chocolate chips. Fresh and Easy has some inexpensive but delicious chocolate. Remember the yummier the chocolate the yummier the icing!


Enjoy!


From the cookbook "Serena, Food & Stories: Feeding Friends Every Hour of the Day" Cheating Chocolate Cake and Ganache.

Tuesday, December 28, 2010

Bacon Jam – yes, bacon jam

Check out my husband’s BBQ blog for a post on Bacon Jam that we made tonight to dress up hamburgers. Good stuff!

http://timcraig.blogspot.com/

Sunday, January 10, 2010

Balsamic Glazed Brussels Sprouts with Pancetta

We made this for Christmas dinner 2009 and we all really enjoyed it. Best way to eat brussels sprouts we have found yet.

This simple one-pan preparation is long on flavor, thanks to the pancetta and balsamic vinegar. If pancetta is hard to come by, substitute two thick slices of bacon.
Serves two to three.

image

2 oz. pancetta, cut into 1/4-inch dice (about 1/2 cup)
1 to 2 Tbs. extra-virgin olive oil
10 oz. Brussels sprouts (about 18 medium sprouts), trimmed and halved through the core
1/4 cup balsamic vinegar
Freshly ground black pepper
2 Tbs. unsalted butter
Kosher salt

In a heavy 10-inch straight-sided sauté pan set over medium- low heat, slowly cook the pancetta in 1 Tbs. of the oil until golden and crisp all over, 10 to 15 minutes.

With a slotted spoon, transfer the pancetta to a plate lined with paper towels, leaving the fat behind. You should have about 2 Tbs. of fat in the pan; if not, add the remaining 1 Tbs. oil. Have ready 1/2 cup water. Put the pan over medium-high heat and arrange the sprouts cut side down in a single layer. Cook undisturbed until nicely browned, 2 to 3 minutes. When the sprouts are browned, add the water to the pan, cover immediately, and simmer until the sprouts are tender when poked with a fork or skewer, about 3 minutes. (If the water evaporates before the sprouts get tender, add more water, 1/4 cup at a time.) With a slotted spoon, transfer the sprouts to a plate.

Return the pan to medium-high heat and if any water remains, let it boil off. Add the balsamic vinegar and a few grinds of pepper. Boil the vinegar until it’s reduced to about 2 Tbs. and looks lightly syrupy, about 2 minutes. Reduce the heat to low, add the butter, and stir until melted. Return the sprouts and pancetta to the pan and swirl and shake the pan to evenly coat the sprouts with the sauce. Season to taste with salt and more pepper and serve.

From Fine Cooking 74, pp. 30
November 1, 2005

Online: http://www.finecooking.com/recipes/balsamic-glazed-brussels-sprouts-pancetta.aspx

Wednesday, November 25, 2009

Dry Chimichurri Rub

This recipe came from a magazine – and when I find it again I will add that information to this post. We made this rub up a few year’s ago and gave it out as small gifts to friends. We put it in a shaker bottle and provided the recipe with the rub. We enjoyed ours, and heard good things from our friends about it. We purchased the herbs from Penzeys Spices and were happy with the prices and quality.

OK – here’s the recipe & the notes we included to friends:

In Argentina, this mix of herbs and spices is combined with oil and vinegar and used as a sauce for grilled meats.

Serving Suggestion: Rub all over tri-tip before roasting; sprinkle over halibut fillets before pan-searing; make a marinade for roast chicken by whisking ¼ cup rub with ½ cup olive oil and 3 tablespoons red wine vinegar.

For best results (in case you want to make more!), use dried herb leaves – not powered or ground. We got our fresh herbs and spices from http://www.penzeys.com – the prices are comparable or better to other sites, and the selection is excellent.

This rub recipe makes about ¾ cup

3 tablespoons dried oregano
3 tablespoons dried basil leaves
2 tablespoons dried parsley flakes
2 tablespoons dried thyme leaves
2 tablespoons coarse kosher salt
1 tablespoon freshly ground black pepper
1 tablespoon dried savory leaves
1 tablespoon smoked paprika (sometimes labeled Pimentón Dulce)

Whisk all ingredients in a medium bowl. Transfer to an airtight container.

Can be made 1 month ahead.
Store at room temperature.

Monday, August 18, 2008

Chocolate Chip Cruncher Cookies

One of our favorite treats to have around the house.

1 cup Butter
1 cup White Sugar*
1 cup Brown Sugar
2 teaspoons Baking Soda
2 teaspoons Vanilla
2 Eggs
2 1/2 cups Flour
2 cups Corn Flakes, gently crushed but not pulverized
1 package Semi-Sweet Chocolate Chips, mini chips are the best

You have your choice of putting your butter in the microwave until soft (but not hot!) or just letting it sit on the counter for a bit first. This will make creaming the butter a little bit easier, but it's not necessary if you're using a mixer. So...Cream the butter. And do use butter! You will get a very different cookie if you use margarine.

Add the sugars and cream them together.

Add the eggs and vanilla, mixing until incorporated.

Add the flour, corn flakes and chips. Mix.

Roll into walnut sized balls, squish a bit on parchment lined baking sheet, and bake at 375 degrees till done about  XX minutes. They should have some color to them. (You do not have to use parchment paper but it makes clean up easier and the cookies are less likely to stick)

Cool on pan for 2 minutes before moving. Place on cooling rack.
Enjoy!


*Use may also use vanilla sugar. To make Vanilla Sugar get a jar or other container and split a vanilla bean in half. But the bean in the jar so that it stands up and pour in regular white sugar until the jar is filled. Do NOT use vanilla extract! Allow this to sit for a few weeks. The longer it sits, the more perfumed the sugar will be.

Use as you would regular sugar.

FYI you may still add vanilla extract to recipes. Vanilla will cook off as you bake things.


This recipe is from Joanne fluke's "Chocolate Chip Cookie Murder"

Saturday, January 26, 2008

Lo Pollo

Sautéed Chicken Breasts with Rum
Serves 2

2 (8 oz) skinless boneless chicken breast halves
1 Tablespoon Olive Oil
1/4 Cup Dark Rum
2-3 teaspoons fresh lime juice
2 teaspoons unsalted butter
lime, thinly sliced for garnish (if you want it, we usually skip it)

- Flatten chicken to 1/4" thickness & season with salt and pepper

- Heat oil in a heavy skillet over medium-high heat until oil is hot, but not smoking. Add chicken & saute until browned & almost cooked through, about 1 1/2 minutes on each side.

- Remove pan from stove, carefully add rum. Carefully light match (or other lighting tool) & ignite rum. When flames subside, return pan to stove. Add lime juice & butter, shaking skillet to incorporate. Cook, turning chicken in sauce to coat, until chicken is just cooked through, about 1 minute more.

- Transfer chicken to plate. Season pan juices with salt & pepper & pour over chicken.

Enjoy!

We like to pair this dish with a rice pilaf. The one we like is store bought - Near East Rice Pilaf mix (original).

Sunday, January 6, 2008

Create Your Own Cookbook

I ran across this article on the site 101 Cookbooks and thought some folks might be interested in it.

It focuses on a web-based publishing concept called TasteBook, which actually looks pretty cool.

Here's the link to the blog posting. If you have a lot of favorite recipes you would like in one place, or you would like to give a book of your favorites as gifts, then you should take a look.

Saturday, December 15, 2007

Double Peanut Pie

This pie is a riff on Pecan Pie. It is very similar in looks, but the taste is all peanuts. 

Simple to make - but very tasty!

1 9-inch unbaked pie crust
3 eggs
1 cup dark corn syrup
1/2 cup sugar
1/2 cup creamy peanut butter
1/2 teaspoon vanilla extract
1 cup salted peanuts
whipped cream for garnish

1. Prepare pie crust. Preheat oven to 350 degrees F.
2. In large bowl with mixer at medium speed, beat eggs with corn syrup, sugar, peanut butter and vanilla until smooth. Stir in peanuts.
3. Place pie plate on oven rack; pour mixture into crust. Bake 55 to 60 minutes or until knife inserted about 1 inch from edge comes out clean. Cool. Garnish servings with whipped cream.


The Good Housekeeping Illustrated Cookbook, 1989, Page 356

Roasted Fingerlings with Red and Yellow Piperade

We have only made this once (and we multiplied the recipe by 5!! - which we don't recommend - too much to deal with), took it to a HVOC dog club gathering for the holidays and it was a total hit. We have to agree, it's a keeper of a recipe. So here it is if you would like to try it...


Makes 8 to 10 Servings The small potatoes known as fingerlings have a sweet, buttery flavor. Small red-skinned potatoes would work too. [we recommend the fingerlings. We got ours at Costco]

1/2 cup plus 2 tablespoons extra-virgin olive oil
2 large red bell peppers, stemmed, seeded, cut into 1/4 - 1/3-inch-wide strips
2 large yellow bell peppers, stemmed, seeded, cut into 1/4 - 1/3-inch-wide strips
1 large red onion, halved through core, thinly sliced crosswise
3 pounds fingerling potatoes, halved lengthwise [if there are any really thick ones, cut them in thirds or quarters]
1/2 cup chopped fresh parsley
1/4 cup chopped shallots
1/4 cup chopped fresh chives
1/4 cup chopped fresh basil
1 tablespoon chopped fresh thyme
1/4 cup Champagne vinegar

Preheat oven to 425 degrees F. Pour 1/2 cup extra-virgin olive oil onto large rimmed baking sheet. Spread all peppers and sliced onion over, sprinkle with salt and pepper, and toss to coat. Roast 10 minutes.
Place halved potatoes and remaining 2 tablespoons olive oil in large bowl. Sprinkle with salt and pepper; toss to coat. Arrange potatoes in single layer atop peppers. Roast until potatoes are tender and beginning to turn golden, about 50 minutes.

Do Ahead:
Can be prepared 2 hours ahead. Let stand at room temperature. Rewarm in 425 degree F oven for 10 minutes before continuing.
Sprinkle chopped parsley and shallots over potatoes and toss to coat. Roast potatoes 5 minutes longer. Transfer potatoes to large platter. Sprinkle with chives, basil, and thyme. Drizzle with Champagne vinegar and toss to coat. Season to taste with salt and pepper.

Piperade refers to the classic Basque stew made with tomatoes, bell peppers, onions, and garlic.


Bon Appetit, November 2007 issue, page 155

Friday, August 31, 2007

Lemon Buttermilk Poppy Seed Cake

Serves: 16
Prep Time: 15 Minutes
Baking Time: 45 - 50 Minutes

Vegetable oil spray for misting the pan (or whatever works for you)
Flour for dusting the pan

1 package (18.25 ounces) plain white cake mix (we have substituted yellow and it is yummy)
1 package (3.4 ounces) vanilla instant pudding mix
1/3 cup poppy seeds
1 cup low-fat vanilla or lemon yogurt (we use vanilla)
1/2 cup vegetable oil, such as canola, corn, safflower, soybean, or sunflower
1/2 cup buttermilk
4 large eggs
2 tablespoons fresh lemon juice (from 1 lemon)
1 teaspoon finely grated lemon zest (from 1 lemon)

1. Place a rack in the center of the oven and preheat the oven to 350 degrees. Lightly mist a 10-inch tube pan with vegetable oil spray, then dust with flour. Shake out the excess flour. Set the pan aside.

2. Place the cake mix, pudding mix, poppy seeds, yogurt, oil, buttermilk, eggs, lemon juice, and lemon zest in a large mixing bowl. Blend with an electric mixer on low speed for 1 minute (we use a KitchenAid mixer and can actually make a double recipe in the standard bowl). Stop the machine and scrape down the sides of the bowl with a rubber spatula. Increase the mixer speed to medium and beat 2 minutes more, scraping the side down again if needed. The batter should look thick and well blended and the poppy seeds should be evenly distributed. Pour the batter into the prepared pan, smoothing it out with the rubber spatula. Place the pan in the oven.

3. Bake cake until it is golden brown and springs back when lightly pressed with your finger, 45 to 50 minutes. Remove the pan from the oven and place it on a wire rack to cool for 20 minutes. Run a long, sharp knife around the edge of the cake and invert it onto a rack, then invert it again onto another rack so that the cake it right side up. Allow the cake to cool completely, 30 minutes or more.

4. Place the cake on a serving platter and serve.


** Store this cake, covered in aluminum foil or plastic wrap, at room temperature for up to 1 week. Or freeze it, wrapped in foil, for up to 6 months. Thaw the cake overnight on the counter before serving.